Light Sensor Calibration
If your program uses a Light Sensor, then you are probably using lines for navigation (either following a line, stopping on a line, or counting lines). These lines are usually shown against a light background. So, there will be two common values that you will be measuring, the value of the Light Sensor when on the white background and the value when on the black line. The white background, black lines, and ambient room lighting form the "environment" in which the robot operates.
If you have not configured the light sensor for your particular "environment", then the sensor will return un-calibrated values. For example, the un-calibrated value from the Light Sensor over a white background might be 52 and the un-calibrated value when over a black line might be 26. The white background clearly generates a higher value than the black line. This is because more light is reflected off of that surface.
A worse situation might arise if you have calibrated the light sensors for one environment (such as your practice table or room) and then tried using the robot in a different environment (such as a tournament) without re-calibrating.
If you program uses "un-calibrated" Light Sensors, then you will need to use these un-calibrated values for various criteria to make your robot move, turn, or stop based on certain light sensor conditions. However, if you "calibrate" the Light Sensors, then you can develop programs which operate on a given range (0 to 100) of light values. This range will represent the "calibrated" values from the Light Sensor when over the line or over the background. Because the range will always be from 0 to 100 when on the line or on the background, you do not have to change your program if the environment changes (brighter lights, different lighting, or different surfaces). All you need to do is to re-calibrate the Light Sensors for the new environment.
Tip:: Calibrated Light Sensors return values from 0 to 100 when on a line or on a white background.
Please note that the "calibration" only needs to be performed once and the robot will remain calibrated even if turned off. The calibration remains with the robot and affects all light sensors regardless of the port they are connected to.
Is the Robot Calibrated? Or, Not?
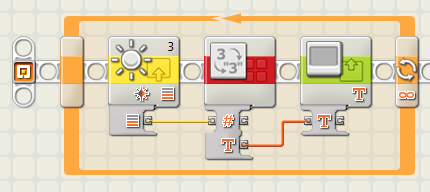
This can be a tricky question to answer. Examine the program shown on the right. It gets the light sensor value, converts it to text, and displays it in the window.
Move the light sensor over the line and over the white background. If the values returned range from about 0 to about 100, then the Light Sensors are calibrated in the robot. Please note that you may need to re-calibrate the robot if the environment has changed. If the values returned range from about 25 to about 60, then the robot is not using Calibrated light sensors.
Un-Calibrate the Sensors

Some programs may work better using un-calibrated light sensors. To un-calibrate the light sensor, just open a new program and insert the single calibration block (see below). Set the Action to "Delete" and then simply run this program.
This will un-calibrate the light sensors.
Method 1: Manual Calibration of the Light Sensors

This method requires you to physically move the robot for the different stages of the calibration program.
#pragma config(Sensor, S3, lightSensor, sensorLightActive)
const string sFileName = "LightRange.txt";
TFileIOResult nIoResult;
TFileHandle hFileHandle;
int nFileSize = 20;

long tLowLight = 9999;
long tHighLight = 0;
long tCurrLight = 0;
task main()
{
  CloseAllHandles(nIoResult);
  wait1Msec(500);
  PlaySoundFile("OK.rso");
  wait1Msec(11);

  nxtDisplayCenteredTextLine(1, "Move over line");
  nxtDisplayCenteredTextLine(2, "back and forth");
  nxtDisplayCenteredTextLine(3, "several times.");
  nxtDisplayCenteredTextLine(4, "Press orange");
  nxtDisplayCenteredTextLine(5, "when done.");
  while(true) {
    wait1Msec(500);
    tCurrLight= SensorRaw[lightSensor];
    if(tCurrLight < tLowLight) { tLowLight = tCurrLight; }
    if(tCurrLight > tHighLight) { tHighLight = tCurrLight; }
    nxtDisplayCenteredTextLine(6, "%d to %d", tLowLight, tHighLight);
    Delete(sFileName, nIoResult);
    hFileHandle = 0;
    OpenWrite(  hFileHandle, nIoResult, sFileName, nFileSize);
    WriteLong(hFileHandle, nIoResult, tLowLight);
    WriteLong(hFileHandle, nIoResult, tHighLight);
    Close(hFileHandle, nIoResult);
    if(nNxtButtonPressed == 3) break;
  }
  tHighLight = 0;
  tCurrLight = 0;
  OpenRead(  hFileHandle, nIoResult, sFileName, nFileSize);
  ReadLong(hFileHandle, nIoResult, tLowLight);
  ReadLong(hFileHandle, nIoResult, tHighLight);
  Close(hFileHandle, nIoResult);
  nxtDisplayCenteredTextLine(7, "%d to %d", tLowLight, tHighLight);
  PlaySoundFile("OK.rso");
  wait1Msec(2000);
}
Download this program
Method 2: Automatic Calibration of the Light Sensors