Overview
There are several basic elements for navigation: driving straight (forward or backward), turning (clockwise or counter-clockwise), measuring distance (rotation sensor or ultrasonic sensor), detecting/following lines (light sensor). Within any one of these activities, there is going to be some degree of error. The robot might not stop at the right spot, may turn too much or too little, may not react quickly enough to things in the environment it senses. The robot may have more, or less, traction depending on the tires it is using, the condition of the mat and status of the battery.
Understanding these limitations will help you to ensure your robot is able to navigate as best as it can. When your are trying to navigate your robot around obstacles to get to a certain spot on the game board, it is important that you take into account the limitations and variability that the robot will experience.
It would probably benefit you to assume that every action by the robot will have a certain amount of variance (or error). This error requires you to make sure the robot has a way to correct itself. One of the best ways to correct for errors in the robot's navigation is to periodically re-align the robot to the game board. This can be done by "squaring up" with a wall (backing into a wall; driving forward into a wall; or using caster wheels on the side of the robot to align itself with the wall). You can also get the robot to detect where it is on the board by looking for lines and using the ultrasonic sensor to measure distances to objects.
In summary, if you want your robot to know where it is, you will need to make sure your robot has a light sensor, ultrasonic sensor, and/or touch sensor. Without these sensors, your robot would simply drive without any understanding or awareness of its surroundings.
Importance of Understanding Error and Variance
All robots will have some degree of error or variance in their movements.
You can write a program to tell the robot to move forward 3 rotations and then turn 5 rotations and then move forward 6 rotations. While your program seems to be very specific about the instructions you gave to the robot, you may find that the robot will end up at a slightly different spot each time you execute the program.
Why is that?Each action that the robot takes will have some amount of error. The amount of error can be controlled (reduced) to some extent through the use of good construction techniques (design). But there will be some amount of error. No robot is perfect in its execution of the program. Some sources of error also include slippage between the wheel and the surface, backlash between gears (see figure). Backlash is the maximum distance through which one part of something can be moved without moving a connected part.
 The problem that has to be addressed with robot navigation is that the error is multiplied with each action of the robot. The effects of the error are cumulative so that after several several moves, the robot may be greatly off target.
For example, if the robot is programmed to make a 90 degree turn and then drive straight for 30 inches, the robot may be several inches off from its target because it may have turned 95 degrees and then drove for 28 inches. Or it may have turned 85 degrees and drove for 32 inches. The error becomes plus or minus 5 degrees times 30 inches (give or take a few). A 5 degree error in turning multiplied by 30 inches travelled would result in an error of almost 3 inches at the end of the move. If you are trying to get the robot to a certain spot, is it OK if you are 3 inches off of the target? In general, the probability that it turned exactly 90 degrees and drove for exactly 30 inches is fairly low.
To compensate for some of these errors, many teams try to reduce the number of times the robot has to turn. Also, they will try to point the robot in a specific direction (by hand or by using a jig). Or, some teams may opt for smaller wheels so that any backlash within the motor would have less of an effect due to the smaller circumference of the smaller wheels. These techniques have limited usefulness as none of them address the problem of Backlash within the gears contained in the motor itself, slippage of the tires on the mat, misalignment of the robot at the start of the mission, or even variance in how well the robot is following the program.
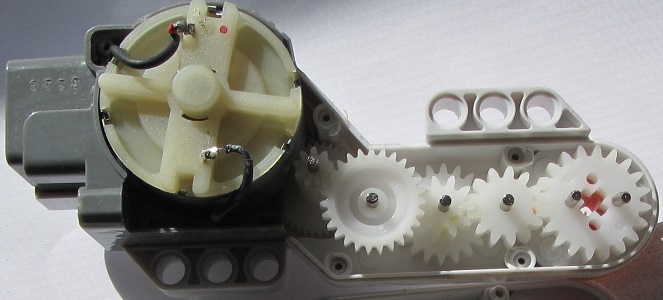
Interior view of NXT Motor
Part of the reason why aiming a robot by hand or by using a jig has limited usefulness is because there will be "slack" built up from the backlash of numerous gears inside the motor. This backlash needs to be addressed before the robot is moved. For example, you could try to slightly rotate the wheels before placing the robot against the jig. Or slightly rotate the wheels before pressing the start button to run your program. But often this may be difficult to remember during a tense competition situation.
A better solution is to get the robot to automatically eliminate the "slack" by backing itself against a wall or against the jig itself.
Understanding the Rotation Sensor
Within most programs, the robot is told to turn motor B for a certain number of degrees. The number of degrees is calculated using a simple algebra formula as the distance divided by the circumference of the wheel times 360 degrees.
The question becomes, when and how does the robot know that the motor has turned x number of degrees. How exactly does the robot know when to stop turning the motor? Each motor has a built-in rotation sensor which is comprised of a small light, light sensor, and a wheel that has slots. The light is projected onto the slotted wheel and a light sensor detects the pulses of light that appear when the motor turns the wheel. These pulses of light are counted and various algorithms are used to determine the exact number of degrees that the motor has rotated.
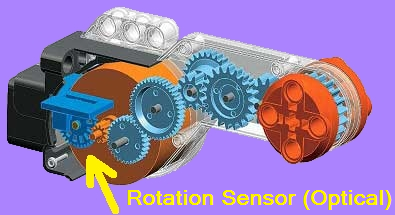
Interior view of NXT Motor
There is a slight flaw in this system. Well. Maybe not a flaw, but rather a "weakness" that needs to be understood. You see, when you tell the motor to turn for a certain number of rotations, the robot needs to calculate when it should stop turning. This calculation takes into account that the motor will not stop instantly. There will be a few microseconds after the power is stopped until the rotational inertia of the motor's parts finally is dissipated. In common usage the term "inertia" may refer to an object's "amount of resistance to change in velocity" (which is quantified by its mass), or sometimes to its momentum, depending on the context. When the parts of the motor start turning, "rotational inertia" will keep them turning until a force is applied to stop them. This "stopping" of the motor takes a few microseconds. It isn't instantaneous. Therefore, the robot undergoes a calculation to determine when it should start the process for turning off the motor. The robot will start this process a few microseconds "before" the rotation sensor measures the pre-determined stopping point. In essence, the motor will "ramp down", or "slow down" prior to stopping. This is because the robot cannot stop the motor instantaneously. There will be some minimum amount of time (very small; but still there) to stop the parts of the motor from continuing to move.
It's possible that the robot may even attempt to adjust for any "overshooting" of the goal. So, for example, if you tell the robot to move for 360 degrees and it moves for 361 degrees, it may decide to "back up" a degree. These types of decisions are made by the robot depending on which commands you give it and what options you select in those commands.
A certain amount of rotational inertia will be created in the gears and wheels attached to the robot itself. Even the robot's mass and velocity will affect the amount of momentum created simply by moving. Because the wheels are connected to the motors, the momentum of the robot may alter the stopping point of the robot. A robot with a significant amount of mass will take longer to stop.
So, if you tell the robot to drive forward 24 inches and it drives for 25 inches instead, don't be surprised. You might even run the exact same program and the robot might stop at 23 inches instead. There is variability and error in the mechanics of the motor, gears, and tires and even variability and error in the computational algorithms and how they are implemented by the robot. This variability and error needs to be recognized and understood to help build a more robust robot.
Effects of Distance
What if you wanted the robot to drive forward 1 inch, turn 90 degrees and drive forward 1 inch, turn 90 degrees and drive forward 1 inch, turn 90 degrees and drive forward 1 inch?Chances are pretty good that your robot will be very close to where it started. It may in fact be less than 1 inch away from where it started.
What would happen if we tried the same experiment using longer distances.What if you wanted the robot to drive forward 10 feet, turn 90 degrees and drive forward 10 feet, turn 90 degrees and drive forward 10 feet, turn 90 degrees and drive forward 10 feet?How far will the robot be from its starting point? A foot? Two feet? More?The point of this mental exercise is that in FLL, the robot game board is 8 feet long by 4 feet wide. If you send your robot from one end of the board to the other, it may get there. But it will probably be a little off. The key word is:
probably.
What are the chances that it will land at exactly the right spot?
Imagine an FLL game board that is 4 feet by 8 feet. In FLL each wall is assigned a directional name: North, East, South, West. Usually there is a "Base" in one corner (usually it's the Southwest corner). Now imagine your goal is to get the robot from base to touch the Eastern wall and there is nothing on the board that would stop you--no obstacles, no models, no stuff. How hard would it be to complete this simple mission? With no stuff in the way, chances are pretty good that you will be able to get the robot to touch some part of the Eastern wall. After all, the Eastern wall is 4 feet long. Surely you could land the robot somewhere along that wall.
Now let's make this a little harder. What if the goal was to touch the middle of the Eastern wall and in fact you had to use an axle as an attachment to touch the center of the Eastern wall no more than 1 centimeter from the exact dead center of the wall. If your robot's axle attachment is more than 1 centimeter away from the center of the Eastern wall, then you lose. Could you do it? Could you get your robot to travel 8 feet and land "dead center" on a dime? How can you get your robot to be that precise?
What are the chances the Robot will be exactly where I need it to be?
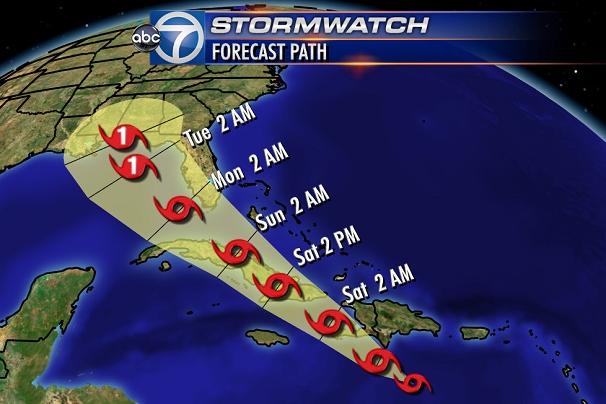
Forecast of the Path of a Hurricane
Predicting where the robot will be at a certain time is sort of like predicting the future location of a hurricane. We know where the hurricane is starting.
But where will it be in 5 days? Which cities need to prepare for evacuation? Which costal areas will be affected?While we understand the parameters that affect weather to some extent, there is still going to be some variance and error in our measurements. Therefore, we need to take into account that variance and error when we are making a prediction about the future.
How does this apply to robotics?
Over a certain distance, time, and number of moves, a robot's final position may vary from what was initially expected. It may be a few inches to a few feet off of its target position, track, or path. Understanding this can help you to develop strategies for performing missions with greater degrees of accuracy and precision.
If you look at the forecasted path of the hurricane, you will notice that it starts out as a small point (on the right part of the image). As the hurricane moves westward, there is a specific path which is projected and displayed on the graph using the red hurricane symbols. However, with each day, there may be some variation of its movement or error in our measurements. Therefore, the forecasted path has an ever increasing range of possibilities (indicated as the tan area that grows with each day). Please note that this tan area is not an indicator of the size of the hurricane. Rather, it is an indicator of the possible location of the eye of the storm at that particular day and time. By Tuesday, Hurricane Isaac was predicted to possibly reach landfall in the Florida panhandle or possibly still be hundreds of miles at sea heading for Louisiana.
There may be dozens of reasons why your great robot will not make it to the desired mission location.
In FLL robotics, your robot may start out in base. But it may be inches to several feet off from its desired path by the time it reaches the other end of the board. This is because FLL robots are subject to variance (error) caused by backlash between the internal gears in the motors, unstable robot designs, drag/friction with the mat, slippage in the tires, incorrect aim by the user, delays in processing measurements and readings from the sensors.
Probability
I can tell the robot to drive forward 30 inches and then stop. When I run the program, I observe that the robot in fact proceeds exactly 30 inches and then stops. But the second time I run the program, the robot goes 30.1 inches and then stops. This second time, the robot has gone an extra tenth of an inch in distance. This might not seem like a lot. But what if I need the robot to be at exactly 30 inches before I make the next move because if it is more than 30 inches, then it will be off target and the mission will not be a success.
This shouldn't be too hard. I know I can get the robot to go exactly 30 inches. In fact it does this about 5 out of 6 times. It almost does it all the time. But every once in a while it is off. This sounds like the robot is fairly accurate. It stops at the correct distance 85 percent (85%; 0.85) of the time.
And when I ask the robot to turn 90 degrees, it turns accurately about nine out of ten times. This seems like a good number. Who could argue otherwise. The robot is getting a 90% correct score for turning. It is about an "A" if it were in school performing this as a test.
The robot only misses once in a while. So, it must be doing good. Right?
Well. Maybe. For a simple mission close to base, this is just fine. The "A" robot would perform the mission with about an "A" score. The problem comes in when the robot has to do more than one move to accomplish complex missions. Complex missions are far from base requiring multiple turns and moves. The robot that scores an "A" for simple missions close to base may start getting F's for missions far from base. But why? I thought it was an "A" robot?
How can a robot that gets A's and B's for turning and going straight end up with F's simply because we have to make multiple turns and moves?
Probabilities of Success
Let's say that you need to get the robot to a specific spot on the game board to interact with a mission model at that location. To get there, you have to run a program that requires you to turn, then go straight, then turn again. After the first turn, the robot has about a 95% chance of being where it needs to be in order to drive straight.
I guess that would be an "A" for that turn. The robot is able to drive the exact distance about 85% of the time.
The robot would get a "B" for driving that distance. Not bad. And when making the final turn, the robot is able to turn the correct number of degrees about 90% of the time.
Great. Another "A". In the end, the robot's probability of success will be .95 x .85 x .90 = .73
What? A "C"? How did that happen? In summary, the robot has a 1 in 4 chance of not being able to complete the mission.
If the robot gets to the target 3 out of 4 times, that doesn't seem too bad. Does it? Now imagine the robot has to get from the mission model back to base (or to another mission model). Now we have to factor in the extra turns needed to get back to base.
The robot's probability of success in getting to the mission model and returning to base will be .95 x .85 x .90 x .90 x .85 x .95 = .53
What the !#$@? This is an "F"These numbers show that there is a 47% chance the robot will fail in its mission.
The probability of success for a complex mission is equal to the product of the individual probabilities of each move that comprises the complex mission.
This means your robot has about a 50/50 chance of being able to perform the mission and return successfully to base without incurring a touch penalty.
Is that good enough? It depends. If you are just starting out in FLL or are a rookie team, then your measure of success may be in just understanding how to program the robot. But if you are part of an older team that has been doing this for several years, you may be looking for some way to increase the probabilities of success in your missions.
Let's look at the hurricane map again. The hurricane started out as a tropical storm on Thursday south of the island of the Dominican Republic. I can predict that by Saturday there will be a 90% chance that the storm will be over Port-au-Prince Haiti. I would get an "A" for calling for the evacuation of that city. Now, considering that it is still just Thursday, what grade would I get if I also called for the evacuation of Tampa Bay Florida? There's a good chance that the storm will be west of Tampa Bay on Monday. So my prediction that it will hit Tampa Bay may be wrong. There might only be a 20% chance of it hitting that city.
Just like the storm, if my robot needs to get from point A to point B and it takes 4 separate moves and 8 feet to do it, there's a good probability that the mission will fail. But I know that if I can move my robot to a specific spot on the board using a strategy to accomplish this, then my chances of success are greatly increased.
Sensors vs Odometry
Which would you prefer to use?
Odometry or Sensors?
When I want to get from point A to point B, I can use sensors, odometry, or a combination of both. Imagine you need to go to the refrigerator to get a glass of milk. However, it's the middle of the night, a truck hit the power line down the street and you have no electricity. That's right, no lights, no candles, no batteries. You are completely in the dark and cannot see anything. Getting to the kitchen isn't too bad. But now you need to get a glass from the cupboard and then go to the refrigerator to fill it with milk. How can you do it? You can count the number of steps needed (i.e., take two steps forward and turn left then take 3 steps forward and turn left again). Counting the number of steps and turning specific numbers of degrees is called "Odometry". Your "odometry" may be perfect most of the time. But every once-in-a-while, you'll probably miss the glass or miss the refrigerator.
When you try to reach for the glass, you will probably use your hands. Why? What do your hands have that enable them to perform this task? Touch sensors?
Now imagine that same task but with the lights on. No power outage. No blackout. You can now see the cupboard and the refrigerator. Now you can walk up to them and perform your missions. What sensors are you using now. You can sense the light bouncing off of object in your visual field. Though your robot may not have as good of a vision as you do, you can still get your robot to see its environment.
In summary, which would you prefer to use when performing your task? Would you prefer to use Odometry? Or Sensors?
Are Complex Missions Impossible?
If a complex mission requires many moves, does this make it impossible to perform correctly?Complex missions can be performed with 100% accuracy if you understand where the limitations of the robot are and how to deal with those limitations. To achieve an "A" score on complex missions, make sure the robot is not driving blind. Allow the robot to sense its environment. Allow the robot to see where it is and to sense where objects are located. If the robot knows where it is and can find where it needs to be, then it will have a much greater probability of success. Use geographic boundaries and markers. Use the walls. Use the lines. Look for objects. In short, make sure the robot knows exactly where it's at at all times.
Don't let the robot drive on the board without being able to see it and sense it and feel it. Use sensors.
Simple. Each time the robot is able to sense where it is by seeing the lines and detecting objects using the ultrasonic sensor it wipes out all the previous error and variance. Because the robot knows where it is at, it is able to eliminate the errors in the prediction of its position on the board. Instead of having a range of possible positions where the robot "might" be, the robot knows exactly where it is if it's detecting its location using sensors.
Summary
Navigation by Odometry is perilous. Errors and variance are multiplicative and cumulative. In other words, errors grow exponentially with each move. Therefore, try to keep your use of odometry to a minimum. Instead, make the robot see, sense, and feel its environment. You navigate this world through the use of a variety of sensors. Let your robot navigate its world through the use of sensors as well.
Strategies
There are several strategies you can use to help you make sure the robot stays on track. No strategy is absolute or perfect. These strategies are just suggestions.
- When driving straight for distances greater than 10 inches, don't rely on the rotation sensor to determine when to stop driving. If possible, drive toward a line and allow the robot to stop when it sees the line. Or, drive toward and object and have the robot stop when the ultrasonic sensor measures the object to be a certain distance away.
- Try not to drive straight for too long of a distance without having the robot check to see where it is. If you have to drive straight, try to keep the distances less than 2 feet then check where you are--look for markers.
- When turning, try to turn in amounts that are easily visible and verifiable. For example, turn in increments of 90 degrees or 45 degrees. That way, you can easily tell if the robot has turned correctly, or not.
- If you are making the robot drive straight for a short distance (10 or fewer inches), then you can use the rotation sensor.
- After making two turns, you should consider the robot to be completely and totally lost and would need to use some geographic marker to re-establish its position on the game board.
- If possible, avoid pointing the robot toward a specific target. Instead, make the robot align itself to the nearest walls and make the robot turn itself toward the target.
Examples of Strategies
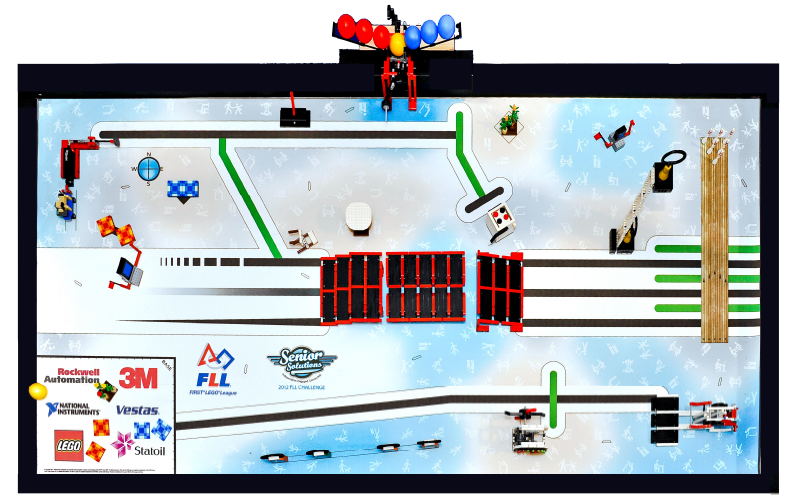
Senior Solutions Game Board
Mission
The Senior Solutions game board (see image) had an elevated platform in the center with a ramp on the Eastern side enabling the robot to drive up the ramp onto the platform. The tricky part is getting the robot into position before driving up the ramp.
One strategy was to point the robot towards the East wall and make it drive about 6 feet and then turn toward the north wall and drive about a foot and then turn toward the West wall to drive up the ramp. Misalignments were easily made and the robot had a low success rate using this strategy.
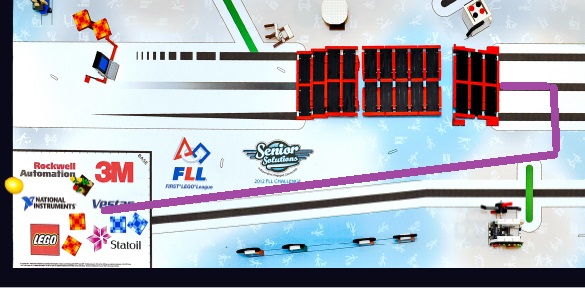
Strategy 1
Strategy 1
Not wanting to write a lot of programming, this team decided to make the robot drive straight, turn, drive straight, turn, and finally drive straight. The kids pointed the robot in the correct direction while it was in base and then sent it on its way. The robot succeeded only a fraction of the attempts. Sometimes the robot ran into the platform before making its first turn. Sometimes the robot turned too much or too little and was not aimed properly to be able to stay on the platform.
Probability of Success: about 50%

Strategy 2
Strategy 2
This strategy used the lines to help the robot to navigate to the desired position. The robot followed the southern line for about 6 feet and then turned 90 degrees and drove forward. Then the robot looked for the first line. Once it found the first line, it then drove forward a few inches and started looking for the second line. Once it found the second line, the robot turned 90 degrees toward the West wall. The robot then followed the center line for a few inches to make sure it was aligned with the board. Then the robot proceeded up the center of the ramp.
Probability of Success: about 100%
As you can see, the mission is simple. Just get the robot up the ramp and onto the platform. However, the two strategies have different probabilities of success.
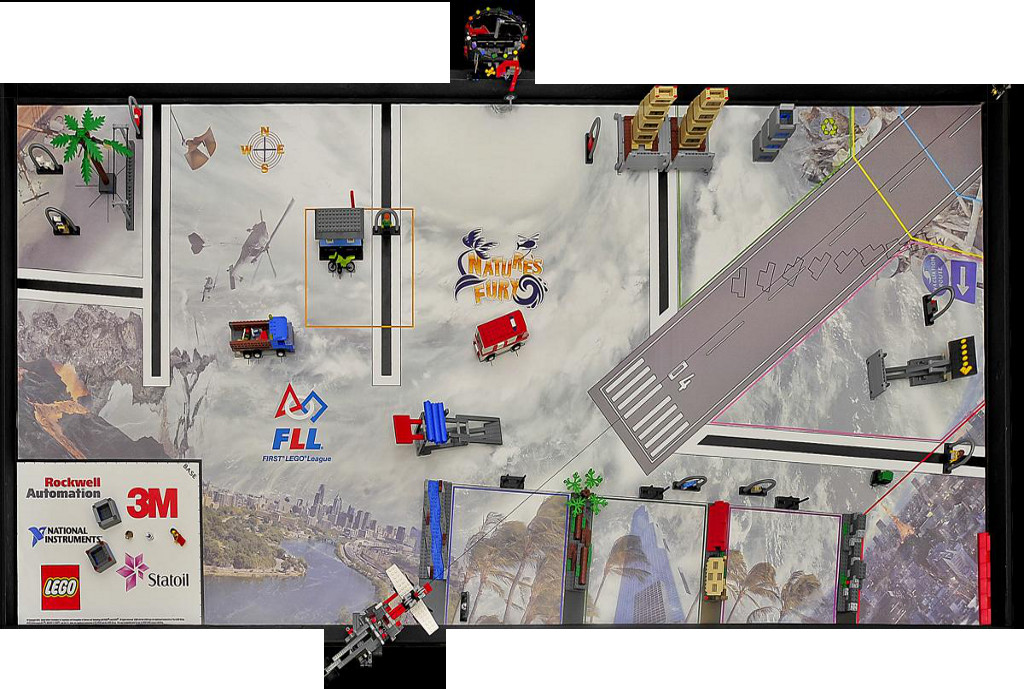
Nature's Fury Game Board
Mission
The mission is to get the robot from base (southwest corner) into the "red zone" (southeast corner). Preferably this done by avoiding the obstacles since hitting obstacles may cause the robot to get out of alignment.
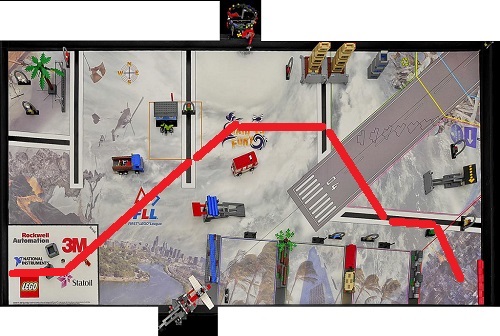
Strategy 1
In this strategy, teams tried to aim their robot for the logo in the center of the board narrowly splitting the distance between the blue and red vehicles. Then turning toward the southeast corner and trying to avoid hitting the sign or southeast obstacle.
Success rate was poor: less than 10% of the time
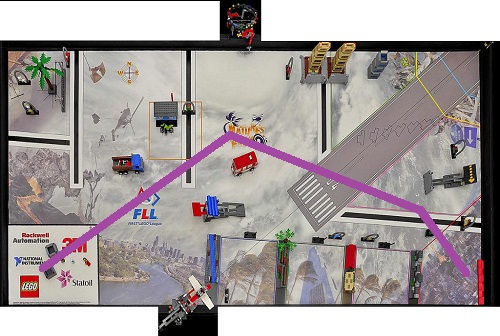
Strategy 2
In this strategy, teams aligned the robot with the West wall then proceeded out of base and turned 45 degrees toward the middle line stopping on the line. Then continuing for a few inches to avoid the red vehicle, turning 45 degrees toward the east. Driving forward and stopping on the eastern line. Turning 45 degrees toward the southeast corner. Driving forward and stop on the southern line and then follow it into the corner.
Success rate was good: about 90% of the time
Part of the reason for the success of this strategy is due to the fact that the robot is sensing the positions of 3 lines. The robot uses these markers to help it in getting to the next position.
Though this robot may be slightly slower since it is looking and checking, it will definitely be more accurate.
Some of you may be thinking: "This sounds all well and good. But stopping on a line is terribly complicated."
Nothing could be further from the truth. Stopping on a line is very easy. Just get the robot to drive forward for an infinite duration. Then follow that with a Wait block that is waiting for the light sensor to see the line. (See: Stop On Line on the MyBlocks page)
Strategy Training
I have found that kids come with various degrees of ability to think strategically about problems. Some kids are older and may have played strategic games (or games that required a specific strategy for successful completion). Other kids are younger and are still just trying to learn and follow rules and strategy is a secondary (or of lesser) concern.
At the beginning of each season, we use the Robot Simulator to practice thinking about strategies and writing pseudo-code to accomplish missions. This simulator creates a "similar" environment as FLL where the robots turn with some level of accuracy that is less than 100% but generally about 90% accurate. Also the robot in the simulator drives forward and stops with about the same accuracy as robots in FLL (sometimes going a little too far or not far enough). Missions start out simple and increase in difficulty as the game progresses. The simulator includes points, levels, obstacles, hazards and a 3D wireframe environment. And like FLL, there are hidden (or unwritten) "freedoms" that you can use to help you accomplish missions faster or with fewer moves.
One of the nice features of the Robot Simulator is that it runs in a web browser and even works on netbooks (i.e., computers without a lot of graphic capabilities).
Robot Simulator