Playbook
Sorry to hear your Robot is non-functioning
This page contains a couple of solutions you can use to get your robot back up and running.
Step 1: Make sure the Robot is connected to the Computer
Use a USB cable to connect the robot and computer. Remember, the USB symbol must be facing upward (toward the sky) when you insert it into the robot and the computer. Now go to the robotC program and access the Robot item from the main menu (see below):
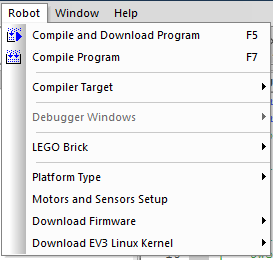
From this menu, select the "Robot Brick" menu item. A sub-menu will appear (see below).
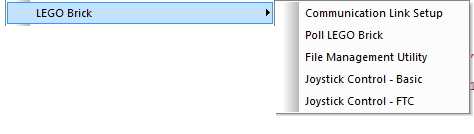
A screen will appear with the robot listed. If you do see your robot listed in the box, then the connection is made and you can try re-downloading your program.
If not, try step 2 below.
Step 2: Re-download Firmware
Look for the large buttons at the top of the RobotC program and find the one that says: "Firmware Download". Click that button (see below).

After downloading the firmware, try re-downloading your program again.
Is it working now? If not, try step 3 below.
Step 3: Remove and re-install the battery
Is it working now? If not, try step 4 below.
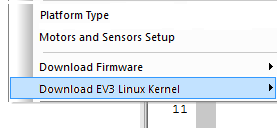
Step 4: Ok. Now we're getting serious. Re-download the Linux Kernel.
From the Robot menu, download the Linux Kernel (last item in the Robot menu). This download will take about 5 minutes.
Still not working?
Ok. Let's try one more step.
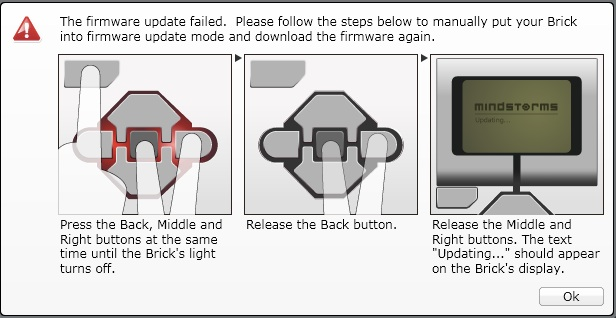
Step 5: Hold Right down on Reboot
Take the battery out. Put the battery back in. Press and hold the "right" button, then press the center button to start the robot. Keep holding the "right" button until it says: "updating".
Connect the robot to a computer. Start the EV3 software from LEGO. Select the Tools menu and then update firmware.
Step 6: Three Fingered Reset
Now go back and repeat these steps starting with Step 2.
If you have done all 6 steps and it still isn't working, contact the coach.